Pages

Friday, February 28, 2014

"About to Get Sick" Soup

"About to Get Sick" Soup
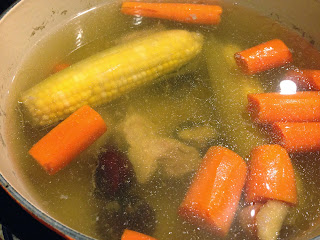
The weather here has just been horrendous. It gets warm, and then the week after, it's below freezing. This makes for a lot of people getting sick and spreading their germs around. Yuck. A friend of mine had told me about this soup and swears that it keeps her and her family from getting sick every time they feel something coming on. Since I was feeling it coming on and K was already feverish for a couple of days, it was only a matter of time before I'd be down for the count as well. May as well give it a go, right?

It's pretty darn good. It's a pretty sweet soup because of the corn and carrots. I have no clue why K didn't drink more of it, but he just didn't care for it. I loved it and just drank it like water throughout the day. TEEHEE. And sure enough, I only had a mild cough for a week (usually my coughs last at least 3 weeks) and then I was ALL better. Hubby didn't get sick at all either. So I'd say it's pretty good stuff.


"About to Get Sick" Soup
(makes about 2 1/2 liters)

Ingredients:
  • 2 small corn on cob with 1 layer of husk
  • 2 medium carrots, chopped
  • 1/2 lb pork sirloin (or any cut of boneless meat)
  • 10 whole chestnuts
  • 2 inch knob of ginger
  • Salt, to taste
  • Water

Directions:
  1. Throw everything into a large 5 quart dutch oven. Fill with water until about 1 1/2 inches of space is left from the top of the pot to the top of the water. Bring to a boil. Lower to the lowest setting and simmer, covered, for 2 hours. Season with salt and skim off any excess fat.
  2. Serve hot and drink as you would water throughout the day.

You can eat the veggies. They're still pretty good. I usually make a soy dipping sauce to eat the meat with when making soups like this. Nothing goes to waste!

Monday, February 24, 2014

Breakfast BEgglewich

Breakfast BEgglewich
As I had mentioned last week, breakfast sandwiches are one of my FAVES. If I'm going to put bacon in my sandwiches, I will usually opt for the breakfast sausage patty instead. Not this sandwich though. I'm perfectly happy to stick bacon in here instead. It is so friggin' YUMMY! Which is awesome since then I don't have to make the breakfast sausages and can just nuke readymade bacon strips that I always have on hand. Quick and super filling breakfast? I think so! In fact, I actually made this on a weekday morning earlier this month and still managed to get to work on time. Score! :D

I wouldn't add the spinach if you're not going to eat it right away though. It has a kind of grassy flavour if you wrap up the sandwich to eat a couple of hours later or so. I'm okay with it since everything else will overpower it but if you're sensitive to "grass" tastes then I'd be cautious.


Breakfast BEgglewich
(serves 2)

Ingredients:
  • 2 jalapeno and cheddar bagels (or any bagel you want), toasted and halved
  • 2 eggs, beaten
  • 2 small handfuls of baby spinach
  • 5 strips readymade bacon
  • 2 cheese slices (processed or cheddar or whatever you want)
  • Salt & pepper, to taste

Directions:
  1. In a small skillet, warm up oil over medium low heat. Pour beaten eggs into the skillet. Move the skillet around to evenly distribute all the egg. Season with salt and pepper. Once the egg is almost all cooked, flip to cook the rest of the egg so that you get a round plain egg omelette. Split the omelette in 2 so that you have 2 half circles. Fold that in half with your spatula.
  2. To assemble, layer a small handful of baby spinach on the bottom of the toasted bagel. Top with egg, then cheese slice. Break the bacon strips in half and lay 3 half-strips on top of the cheese, then add 2 more crosswise. Top with the top of the bagel.
  3. Serve with coffee.

Friday, February 21, 2014

Chicken Teriyaki

Chicken Teriyaki
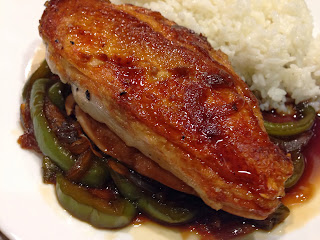
Isn't this chicken breast just GORGEOUS? Lol. I think it's pretty anyway. :)

I love chicken teriyaki. I prefer it with chicken thighs but I'll usually make it with chicken breasts, simply because I don't like deboning a huge package of chicken thighs. Lazy? Hells yes. :P

But you know what? I can always claim that the best is healthier. So there. >:)

Traditionally you'd use mirin but I almost never have mirin at home, so I just use my yellow wine. It works just as well. I just have to add more sugar. That being said, if you have mirin, don't use as much sugar!

The sauce is pretty standard so you can use it to make tofu teriyaki, salmon teriyaki, beef teriyaki, etc. I just like to add veggies to it cuz they soak up all the sauce and impart some flavour to the sauce itself. ;)


Chicken Teriyaki
(serves 2)

Ingredients:
  • 2 boneless chicken breasts (with skin!)
  • 1 medium onion, thinly sliced
  • 1 bell pepper, thinly sliced
  • 1/2 cup soy sauce
  • 1/2 cup yellow wine/dry sherry/mirin
  • 3 Tbsps sugar (use less if using mirin), more to taste
  • Salt & pepper, to taste
  • 2 Tbsps canola oil

Directions:
  1. In a large skillet, heat up canola oil. Season both sides of the chicken breasts with salt and pepper. 
  2. Put chicken in the pan skin side down. When the skin has a nice golden colour (about 7 minutes), turn it over. Lower the heat to low and cook until the juices run clear. Transfer chicken breasts to a plate to rest. Set aside.
  3. Toss onions and bell peppers into the pan. Cook until onions start to soften. Stir in soy sauce, wine/mirin and sugar, scraping up any brown bits on the bottom. Add more sugar if necessary and cook until sauce is bubbly and thickened.
  4. Spoon onions and peppers onto a plate, top with the chicken breasts and drizzle sauce over chicken. Serve with rice and miso soup (or another clear broth/consomme).

Wednesday, February 19, 2014

Beef Enchiladas

Beef Enchiladas
I have not made beef enchiladas in a LONG long time. Like at least 3 years ago long. I really have no clue why, considering they're so darn yummy. It's almost impossible to find any enchiladas sauce here, so maybe that's why. I did get a bottle from Trader Joe's the last time I went down to the states, so I decided to put it to good use!

Of course after I made this, I stumbled across a recipe for enchiladas sauce. I'm gonna have to try it out next time with this. :D


Beef Enchiladas
(serves 6)

Ingredients:
  • 1 lb extra lean ground beef
  • 1 medium onion, finely diced
  • 1 bell pepper, finely diced
  • 3 garlic cloves, minced
  • 2 355ml (12oz) bottles Trader Joe's Enchiladas Sauce, divided
  • 2-3 Tbsps taco seasoning
  • 1 1/2 cups Greek yogurt (or sour cream)
  • 2 cups cheddar/Monterey Jack cheese, shredded
  • 6 10" whole wheat flour tortillas
  • 2 green onion stalks, finely diced

Directions:
  1. Preheat oven to 375F. 
  2. Pour 1 bottle of enchiladas sauce on the bottom of a 9" x 12" casserole dish/lasagna pan. Set aside.
  3. In a large skillet, cook ground beef with 2 tablespoons of taco seasoning. Once the beef is no longer pink, add in onions, bell peppers and garlic. Cook until the onions are translucent and bell peppers are tender crisp. Stir in about 1/4 of a bottle of enchiladas sauce. You need just enough so that the meat mixture is moist. Season with more taco seasoning if needed.
  4. Spoon 1/6 of the meat mixture onto the center of a tortilla. Top with 1/4 cup of Greek yogurt or sour cream. Tuck the sides in and roll into a burrito. Place seam side down on the casserole dish. Repeat with the other 5.
  5. Pour remaining enchiladas sauce over the burritos, making sure the edges are covered. Top with shredded cheese. At this point, if you want to freeze it for another day, just let it cool down to room temperature, cover with aluminum foil and freeze.
  6. Bake for 20-30 minutes, or until the cheese is all melted. If baking from frozen, leave aluminum foil on top to bake for 60-75 minutes, and then uncover to bake for another 20. Top with green onions.
  7. Serve with salad and Mexican rice.

Monday, February 17, 2014

Breakfast Croissantwich

Breakfast Croissantwich
Breakfast sandwiches are awesome. I love them. Partly because I love warm sandwiches. And partly because mom used to make a simple breakfast sandwich for us for breakfast most days, so it brings back childhood memories. :)

I swear, considering how much leftovers we typically have, most of my meals are made up of leftover stuff from the fridge and pantry. And this is no exception. Excess bacon bits/deli meat/ham/spam/sausages? Check. Day old croissants? Check. Lone bell pepper/frozen peas? Check.

I wouldn't look at it negatively though. It makes breakfast prep just that much easier. ;)


Breakfast Croissantwich
(serves 4)

Ingredients:
  • 4 croissants, cut in half horizontally (to hold food)
  • 4 eggs, beaten
  • 1/2 cup frozen peas/finely diced bell pepper/sliced mushroom/whatever veggie
  • 1/2 cup bacon bits/finely diced ham/spam/whatever meat
  • 1 red chili pepper, finely diced
  • 2 Tbsps canola oil
  • Salt & pepper, to taste

Directions:
  1. Toast croissants in the toaster oven (or at 250F in an actual oven) while you make the filling. Keep an eye on the croissants if using a real oven because they can get too toasty quickly.
  2. In a large skillet or omelette pan, heat up oil. Add in meat and veggies. Cook until heated through. Pour in the egg and red chili pepper. Stir to make a big scramble, keeping in mind to keep the pieces fairly big and/or not too small. Season with salt and pepper. Cook until egg is fully cooked.
  3. Spoon 1/4 of the egg mixture onto one side of a croissant. Top and cut in half (see picture).
  4. Serve with coffee.

Friday, February 14, 2014

Chicken Pie Turnovers

Chicken Pie Turnovers
Okay, confession: I hate using eggwash over pastry. I love the look of it and everything. But I hate having to brush it over the pastry and then having leftover egg and no clue what to do with it afterwards other than making a puny little "scrambled egg".

This is where K comes in. He's small and still eats smallish meals (smaller than ours anyway). So I end up making steamed egg for him with the leftover egg wash. LOL. He likes it and it gets rid of the excess eggwash, so why not?

Anywho, Hubby loves these chicken turnovers. Mainly because he loves chicken pot pie but always complain that he doesn't get enough puff pastry (I like to steal most of it cuz it's my favourite part of a pot pie too :$). So one day I just decided to make the chicken pot pie into a turnover. SUCCESS!

This recipe is a total cheat though. Seriously. The truth of it is that I just threw all these leftover bits and turned it into a turnover. Smart, eh? ;)


Chicken Pie Turnovers
(serves 6-12)

Ingredients:
  • 2 cooked chicken breasts, shredded (or more or less equivalent in leftover chicken)
  • 1 large carrot, finely diced
  • 1 large onion, finely diced
  • 1 cup frozen peas
  • 1 cup leftover/ready made gravy
  • 3 sheets all butter puff pastry
  • 1 Tbsp canola oil
  • 1 egg, beaten
  • Salt & pepper, to taste

Directions:
  1. Preheat oven to 375F. Line 2 large baking sheets with parchment paper and set aside.
  2. In a large pot, heat oil over medium high heat. Add in carrots and onions. Cook until onions are translucent.
  3. Stir in frozen peas, chicken and gravy. Mix and cook until heated through. Season with salt and pepper to taste. Take off the heat.
  4. Roll out each sheet of pastry so that they're each 12" x 12" or so. Using a knife, section each sheet into 4s (aka cut down the middle vertically and then cut down the middle horizontally) to make 12 square puff pastry sheets. Lay the squares on the parchment lined baking sheets.
  5. Spoon about 2 heaping tablespoons of filling on one of the squares. Fold over to make a triangle. Use the tines of a fork to press down on the edges, sealing the turnover. Repeat with the other 11.
  6. Use the fork to poke a few holes on the tops of the turnovers and brush with eggwash. Bake for 15-20 minutes, or until golden brown.
  7. Serve with salad and soup to serve 12, or only soup or only salad with 2 turnovers to serve 6. Alternatively, you can have just one with a salad or soup for a light lunch.

Wednesday, February 12, 2014

Bacon Fried "Rice"

Bacon Fried "Rice"
Surprisingly quinoa is one of those foods that Hubby doesn't mind eating. K actually likes eating it too. As long as it's mixed with something with lots of flavour. Enter the bacon here. I had been craving fried rice but didn't have any leftover rice. So I just used quinoa as a sub. Turned out really nicely. I'm impressed. So much so that we'll probably be making this more often. :)

I like using truRoots Organic Quinoa. It's already pre-rinsed so I don't have to bother with rinsing the quinoa and then toasting it dry before actually doing any cooking. :D


Bacon Fried "Rice"
(serves 4)

Ingredients:
  • 1 1/4 cups uncooked organic quinoa (rinsed and toasted dry)
  • 6 slices bacon, diced
  • 1 cup frozen peas
  • 4 eggs, lightly beaten
  • 2 1/4 cups water

Directions:
  1. In a small pot, add water and quinoa. Bring to a boil. cover and simmer on the lowest heat for 15 minutes. After the 15 minutes, take off the heat and rest for 5 minutes before fluffing with fork.
  2. Meanwhile, cook diced bacon pieces in a large skillet until all the fat has rendered and bacon bits are crisp. Transfer the bacon bits to a paper towel lined bowl. Drain off fat, leaving about 1 tablespoon in the skillet.
  3. Add beaten eggs and stir with chopsticks or a spatula while the eggs are cooking, breaking the egg into bit size pieces. Once eggs are half way cooked, add bacon back into the skillet, along with the peas. Cook and stir until peas are heated through.
  4. Toss in quinoa and stir until combined.
  5. Serve with soup.

Monday, February 10, 2014

Chicken Fajita Wrap

Chicken Fajita Wrap
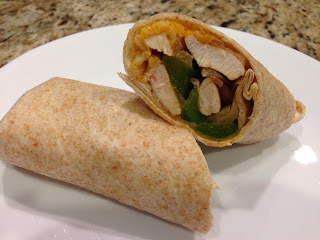
Originally I was going to make the chicken wrap that my mom always made for us when we were younger. But then I forgot to marinate the chicken and pfft. Just added taco seasoning to it and POOF! Chicken fajita wraps. :D

I always have a batch of this taco seasoning on hand. It's awesome and I always have all the ingredients on hand anyway, so why bother buying packaged stuff (that's probably filled with MSG and other crap)?


Chicken Fajita Wrap
(serves 4)

Ingredients:
  • 4 10" whole wheat flour tortillas
  • 2 boneless skinless chicken breasts, sliced into strips
  • 1 large bell pepper, cut into strips
  • 1 large onion, cut into strips
  • 1 cup cheddar/Monteray Jack cheese, shredded
  • 1 Tbsp taco seasoning
  • 1 Tbsp canola oil

Directions:
  1. Place tortillas in oven set to 250F to heat up until warm. (Or place in the microwave and nuke for about 30 seconds just before assembling fajitas.)
  2. In a large hot skillet, heat up oil over medium high heat. Add in chicken strips and cook until opaque. Add in bell pepper strips, onion strips and taco seasoning. Cook until chicken is cooked through and veggies are tender crisp. Add more seasoning if required.
  3. To assemble, place 1/4 cup cheese in the center of a warm tortilla and then top with 1/4 of the chicken and veggies filling. Fold the sides over the filling and roll up into a wrap. Repeat with the other 3.
  4. Serve with salad and/or soup.

Wednesday, February 5, 2014

Mom's Chicken Soup

Mom's Chicken Soup
Call it a broth, consomme or whatever but to me it's a "soup". That's what we call it in Canto anyway.

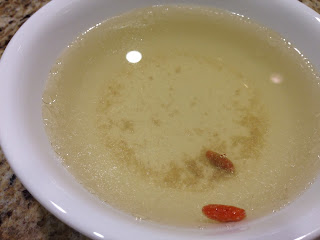
Super SUPER easy. It just takes some time. Mom always uses a whole chicken (skinned so that it's less oily) but I use chicken carcasses. I find that if you use two carcass for a large dutch oven, it's good. I'll use a 3L pot for one carcass. This takes a while, but it's so yummy. I used fresh goji berries for the soup that's pictured, but if you use the dried goji berries, it gives the soup a deeper red colour.

You can get the dried goji berries and dried Chinese yams in Chinese medicine shops or Chinese supermarkets. The goji berries would usually be labeled wolfberries and the Chinese yams would be labeled dioscorea opposita. Thank goodness I know what they look like because I always have a hard time remembering their Chinese names and I never had a clue what their English names were. Just imagine me poking around an Asian supermarket at the bags of Chinese herbs with the English names. Now THAT was a whole new experience. Totally different than going to Chinatown with Mom to shop for these things.


Mom's Chicken Soup
(serves 6-8)

Ingredients:
  • 1 whole skinless chicken, or 2 skinless chicken carcasses (skin on will produce more fat to skim off later)
  • 1/4 cup fresh wolfberries (goji berries), or 3 Tbsps dried wolfberries (goji berries), rinsed
  • 3 pieces dioscorea opposita (dried Chinese yam)
  • 2 inches knob of ginger, smashed
  • Water
  • Salt, to taste

Directions:
  1. Throw everything into a large (5.4L or so) pot or dutch oven. Add enough water to fill the pot/dutch oven 3/4 of the way up with water. Bring to a gentle boil. 
  2. Skim off any scum that surfaces. Lower heat to the lowest setting. Cover and simmer for 2 hours.
  3. After 2 hours, bring the soup back to a boil. Skim off remaining scum and oil. Season with salt.

The soup can be made in a slow cooker. I've dumped the chicken carcasses (frozen or fresh) into a slow cooker with everything else and just cooked it for 6 hours on low. It works fine. Just harder to skim off all the scum and oils at the end because the soup isn't boiling. Still good though!


Monday, February 3, 2014

Broth Butt Chicken

Broth Butt Chicken
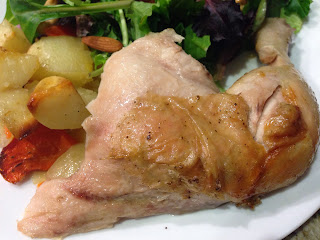
Okay, so I lied. I wasn't going to roast a chicken any other way than when I did my Sage & Bay Salt Roast Chicken but I had a friend's beer butt chicken one day and it was just crazy moist. I was intrigued...

Originally I was going to use some beer instead, but I found some beef broth in the fridge I wanted to use up, so I used that instead. Shouldn't you be using chicken broth instead? Yeah, I probably should've but that would've meant I'd open up another 1L thing of chicken broth when I really only needed to use a little over half a can to cook the thing.

I can't tell you how important it is to let anything you plan on roasting to rest on the counter an hour before you roast it (same goes for steaks). It cooks more evenly so it tastes way more awesome. I hope I never forget to do this. Lol. :P


Broth Butt Chicken
(serves 4)


Ingredients:
  • 1 whole chicken
  • 1 can of chicken broth/beer, can rinsed and dried
  • 4 russet potatoes, washed, peeled & cubed
  • 1 medium onion, chopped
  • 2 medium carrots, chopped
  • 2 celery ribs, chopped
  • 1 head of garlic, cloves separated & peeled
  • 4 tsps Sage & Bay Salt, divided
  • 2 Tbsps extra virgin olive oil

Directions:
  1. Preheat oven to 350F.
  2. In a large bowl, toss potatoes, onions, carrots, celery and garlic cloves with olive oil and 1 teaspoon of Sage & Bay Salt. Pour into a 9" x 12" roasting pan.
  3. Open up a can of chicken broth or beer, pour 1/3 to 1/2 of the can onto the veggies (or consume the beer). Make a little spot in the middle of the pan for the can and place the can in the opened space. Set aside.
  4. Rub chicken with remaining Sage & Bay Salt. Stick the chicken onto the can so that it props the chicken up (as if can is sticking up into its butt opening).
  5. Carefully place roasting pan into the oven and roast for 70 minutes, or until internal temperature reaches 165F.
  6. Carve the chicken and serve with the roasted veggies and potatoes with a side salad.